 |
|
The item(s) contained in this review were purchased by The Naked Whiz website, using funds sourced from reader donations and web site advertising. No considerations, financial or otherwise, were given to or received from Apption Labs.
Introduction
We first got our hands on the MEATER line of truly wireless meat thermometers in the fall of 2017. Yep, 6 full years ago. Since
then, MEATER has seemingly been resting on their laurels with no new improvements or attempts to respond to customer wishes for
improvements. Meanwhile, MeatStick has come out with numerous new products and updates. Combustion Predictive Thermometer
stunned us with their use of 8 temperature sensors in the probe and implementing Bluetooth 5 giving connectivity unheard of
until then. Well MEATER has finally come out with the Meater 2 Plus probe and charger/bluetooth repeater, so let's take a
look and see if they have caught up with the competition.
If you aren't aware of MEATER or products like it, let's take a quick look at what these truly wireless probes are.
When MEATER first came out, it was the first truly wireless, meaning wire-free, meat thermometer. And in case you don't get it, truly wireless means there is no wire between the probe that is stuck into your meat inside of your cooker and the device outside your cooker that displays the temperature information. How do these probes accomplish this? By using Bluetooth to communicate between the temperature probe in your cooker and a smart phone or tablet running an App outside your cooker.
And you ask again, how does it do this (without burning up the electronics)? Oh, they are very clever, they are. By enclosing all the temperature-sensitive components inside the portion of the probe which is stuck into the meat, that's how. That portion of the probe will never get much above the temperature of your meat, so neither will the electronics. The rest of the electronics that make up these probes which can tolerate the higher temperature of your cooker reside higher up in the shaft of the probe in the portion which is exposed to the high heat of the cooker.
What does this mean for cooking meat? Well, no more wires, obviously. No more kinked wires. No more fried wires. And imagine what this could mean for users with rotisseries: no more opening the cooker, stopping the rotisserie and using a handheld thermometer to check the temperature of the meat. And the use of a smart phone or tablet makes the data available via your wifi network and the internet.
So, has MEATER addressed the wishes of their customers for better connectivity, better cook time prediction, and thinner probes? Let's take a look at the Meater 2 Plus and it's features to see how it performs.
Oh, and one last quick word. Obviously, MEATER had to bring out a new version of the MEATER App to support the MEATER 2 Plus, so we'll be pointing out a few changes from the previous App.
NUGGET ALERT: With this review, we have begun using a new feature, the "Nugget Alert". These are nuggets of information about the product that you might wish to pay particular attention to because of their importance.
Improvements
Based upon the MEATER 2 Plus information available on the MEATER website, they have made the
following improvements:
Specifications and Features
After looking at the above list of "improvements" it is pretty clear that this is not just an improved version of the
original probes, but rather a brand new totally redesigned probe. So let's look at the features and specifications
that can be gleaned from the MEATER website.
The MEATER Probe consists of three components, the probe itself, the charger/Bluetooth repeater, and the MEATER app. Here are some features and specifications from the MEATER web page:
For the probe:
A Photo Tour of the MEATER 2 Plus Probe and Charger/Repeater
So now let's take a look at the MEATER 2 Plus Probe and charger. They arrived in a sturdy little cardboard box.
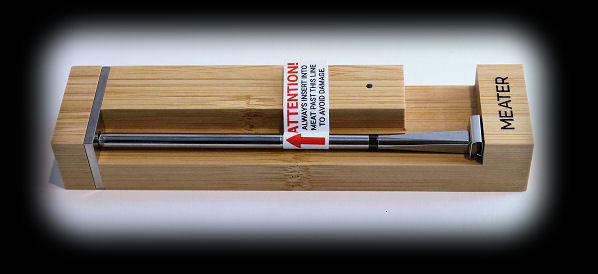
First, a look at the front of the MEATER 2 Plus Probe in the charger/repeater. There are a few things to notice. Here we see the probe installed in the charger/repeater. While it is in the charger/repeater, it is turned off and its internal battery charges from the AAA battery in the charger/repeater.
Now let's take a look at the charger/repeater. To the left you can see the electrode which forms one end of the charging circuit. This is where the sharp end of the probe goes. To the right you can see the other electrode where the flat end of the probe goes.
Next we'll look at the single LED which resides on the front of the charger/repeater. We'll go over its complete behavior later, but for now suffice it to say that it is either off, red or green:
Now, to the back of the charger/repeater. In the photo on the left you can see two silver discs on either end of the charger/repeater. Those discs are relatively strong magnets that allow you to affix the charger/repeater to any magnet-friendly surface. You can also see a black rubber button that says "PUSH" which you can press on to rock open the cover.
In the photo on the left, we have removed the cover of the battery compartment. You can see the AAA battery which does all the charging of the probe. And in the photo on the right, you can see the underside of the cover. The two smaller silver discs on either end of the cover are again magnets that hold the lid in place. The three black spots are rubber buttons that hold the rubber "PUSH" button in place on the cover.
Next, let's look at the MEATER 2 Plus probe compared to the original MEATER probe. As you can see in the photo on the left, the new probe is slimmer. Also, the black ceramic handle has been replaced with a metal handle. There is now only a thin black band of zirconium dioxide, also known as zirconia. This allows the Bluetooth signal to escape from the otherwise all metal probe. You can get an idea of how much slimmer the new probe is in the photo on the right.
Physically, the probe is about 5 inches long. The shaft of the probe is 5mm in diameter, while the upper end is a square that is 0.22 inches on a side. The probe weighs about 14g or 0.5 ounces. In the following photo, we have circled the lines etched into the shaft of the probe which indicate the minimum insertion line. When using the MEATER 2 Plus probe, it MUST be inserted into the meat at least up to this line. The temperature-sensitive electronics are contained in the probe below this line.
In the following photo, we have also indicated the approximate locations of the five internal temperature sensors.
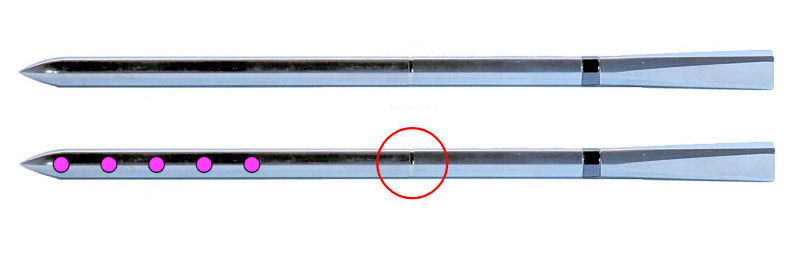
Below from left to right, we have photos of the probe's tip, the center of the probe where you find the line that marks the minimum insertion point, and the upper end of the probe. The minimum insertion line is very important. All the heat-sensitive electronics are located between the tip of the probe and this line. By inserting the probe into the meat up to this point, you ensure that the electronics inside don't get any hotter than the temperature of your meat. That's why you can place the probe into a very hot cooker without damaging the electronics.
The food sensors that measure the temperature of your food are located below this line. They are located equally spaced from the tip up to about 1½ inches from the tip. The upper end of the probe houses the ambient temperature sensor (what most of us would call the pit sensor) as well as the Bluetooth antenna. The ceramic handle of the original probes has been replaced with a metal handle. There is just a thin black band of zirconia to allow Bluetooth signals to escape the probe. The metal handle also serves as one of the electrical connections for charging the probe and is also connected thermally to the ambient temperature sensor. (The other connection is the metal shaft of the probe.)
 |
NUGGET ALERT: It has always been vital the the tip of the handle be kept squeaky clean so that it can make electrical contact with the charger. Although the new probe has a different looking handle, it is still absolutely vital that you keep the tip clean. After 3 hours of smoking (two 1.5 hour cooks) the tip of our probe was dirty enough that the charger could no longer detect the probe. Some 400 grit sandpaper does a great job of cleaning the tip. |
|
NUGGET ALERT: Quite a number of people have reported over the years that when pulling their probe out of the meat, the shaft of the probe pulls apart from the handle. The probe tends to stick to the meat at the surface due to juices solidifying and forming a bond between the shaft and the meat. You can avoid this by always remembering to first push the probe a short distance into the meat to unstick the probe, then pull the probe out. |
Multiple Meat Sensors
MEATER has chosen to put all of its additional sensors down in the end of the probe so as to try to find the coldest
part of the meat and produce the most accurate reading. This means that there is still only one ambient sensor and it
is in a fixed location in the handle of the probe. What this means is that the App doesn't know if the ambient reading
is coming from two inches above the surface of the meat or ½-inch above the meat. You can at least try to
insert the probe so that the ambient sensor is always the same distance above the surface of the meat so that you get
consistent results and adjust accordingly.
Why do we point this out? Well, contrast MEATER's decision to put all the extra sensors down at the end of probe with the Combustion Predictive Thermometer's placement of sensors equally-spaced along the length of the probe:

MEATER 2 Plus temperature sensor locations.

Combustion Predictive Thermometer temperature sensor locations.
Combustion uses the extra sensors as well as the placement of the sensors to determine both the location of the coldest part of the meat as well as the location of the surface of the meat. Thus Combustion can do a better job of predicting the finish time of our cooks.
You can support this website by shopping at The Naked Whiz Website Store and Amazon.com
|

