Update (02/11/09): We have made some changes since initial publication regarding the pricing, content and contact information. We've also added a few tidbits here and there.
- TNW
|
|
Update (03/08/09): We have made a few more changes since initial publication regarding the pricing. - TNW
|
Introduction
We reviewed another product like this back in 2005 and we learned at that time that this type of product isn't intended for low and slow barbecuing in ceramic cookers, so we won't be doing some of the testing that you are accustomed to seeing in our lump charcoal reviews. So, no lighting test, no maximum temperature test and no burn time test. This is a grilling product for the most part and we'll focus on that.
So, what do we have here? Well, we have an extruded brick made from charcoal. What kind of charcoal? We asked the distributor and the reply was "charcoal." We pressed for more information, but the distributors can't provide the source of the charcoal, so we can't either. The charcoal is bound together into a brick with a natural wheat binder.
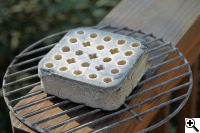
One side of each brick is covered with a starter chemical. Each brick is wrapped in plastic and thus you have a convenient, no mess, self-lighting product. The bricks come in boxes of 4 or 8 bricks. As you can see in the photo below, we have a box of 8 bricks.

A box of 8 BBQ Brick pieces of charcoal.
|
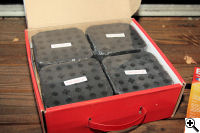
A peek inside the box. Notice the convenient carrying handle.
|
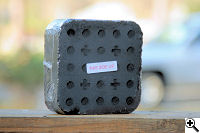
A single piece of BBQ Brick charcoal. The side labeled "This Side Up" is the side with the starting agent.
|

A closeup look at a brick.
|

The obligatory shot of my neighbor's tire through a hole in the brick.
|
Each brick is about 4-7/8 inches square by 1-5/8 inches thick. The bricks weigh approximately 470-490 grams each, or just over a pound.

Each brick is about 4-7/8 inches square.
|

Each brick is about 1-5/8 inches thick.
|
Lighting
To light the bricks, you simply place as many as you are going to use in your grill, ensuring that you place the smooth side up. (Again, the bricks are labeled "This Side Up".) Then apply a match or a lighter to the center cross-shaped hole and wait for the lighting agent to ignite.

A brick ready for lighting.
|
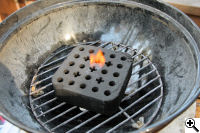
The starting agent has ignited.
|
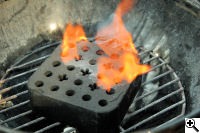
The starting agent now burns its way across the top of the brick, igniting the charcoal.
|

A closeup view of the starting agent burning.
|
You may notice in the closeup photo how the starting agent has burned down about ¼". The ignition of the charcoal only takes about 10 seconds and then you are left with the top ¼" of the brick burning. You then need to give it a few minutes for the burning to penetrate further into the brick and for the heat to hit its maximum level. As you can see in the following chart, it took about 20-25 minutes to reach the maximum temperature. On the other hand, it was ready to cook at a lower temperature in only 5 to 10 minutes.

It is also advisable to let the bricks burn for a few minutes to get started because every once and a while a small unburned speck of the ignition agent down in the holes would finally ignite, giving off a puff of smoke. You probably want to avoid having your food on the grill until this burning is complete.
The manufacturer states on their website that the ignition phase of the burning only consumes 8% of the charcoal resulting in more charcoal left for actual cooking.
How effective is the ignition agent? Well, usually it's pretty dang effective. As of this writing we have started seven of the bricks and five of them started like gangbusters. If we call "gangbusters" a 10 on a scale of 1 to 10, one of the seven bricks was about an 8. Unfortunately one brick was only about a 5. We suspect that it simply didn't get dipped as long or as deep as it should have. The ignition agent didn't fully burn across the surface of the brick. We used a MAPP torch to ignite the rest of it. However, the brick was extremely slow to get up to temperature since the charcoal simply didn't get started as well as it should. Hopefully, this was a one off.
And if you are worried about having charcoal containing an ignition agent stored in your garage or elsewhere, the ignition agent is relatively hard to ignite. Kingsford instant lighting charcoal which is soaked with lighter fluid is far more likely to ignite by accident that these bricks.
Burning
While the ignition aid is burning, there is a relatively strong chemical smell and lot of smoke, but his rapidly dissipates and you are left with a moderately strong smell of burning coconut charcoal. The smell is pleasant, but different than wood smoke.
Once the brick is burning brightly, how hot does it get and how long does it burn? We used a thermocouple to measure the temperature over time:

A BBQ Brick burning away. The themocouple used to measure temperature at the grid level is shown.
|
We placed a high-temperature thermocouple at the grid level, directly over the center of the brick and then let the brick burn. The following chart shows how it did:

Generally speaking, the brick was able to keep the grid in the vicinity of 400 degrees for about 90 minutes. Overall, the brick kept the heat in cooking range for about 2 hours. (Later on, we'll show you how it compared to Kingsford!)
And for you science types, we did measure the temperature of the combustion down inside the brick. It was about 1370° F.
And what about the evenness or distribution of the heat over the brick? We wondered how close to the edges you would want to cook since you need to decide how many bricks you need and in what position to place them. The following chart shows the temperature over the brick at grid level at various distances from the center. The center bar represents the temperature over the center of the brick. Each bar to either side is 9/16" further from the center than the next bar. The purple bars are over the brick, while the white bars are beyond the edges of the brick:
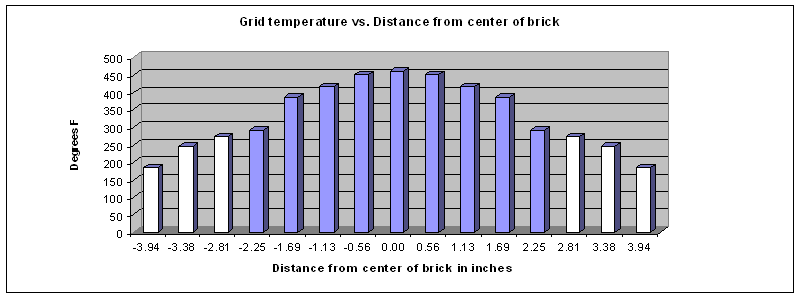
Of course, we also did some cooking to see practically how the bricks did. We placed two bricks side by side and cooked hamburgers over them. We found our results more or less agreed with the chart. Once you get to the edge of the brick, the temperature falls off pretty dramatically and you have to do some rotating of the good to get even cooking. So, it is best to just use enough bricks to provide a large enough cooking area on the grid.
Ash
The website claims that this product is low-ash. This is sort of a funny issue to address. We came to the conclusion with the last product like this that we reviewed that these bricks are really designed for grilling, not for use in smokers. Ash is typically not a big issue on your average grill except for cleaning it up. But, for what it's worth, here goes:
First of all as you can see in this photo, if you don't bump the grill, the brick will burn to ash and hold its shape:
A BBQ Brick after burning. Yes, this is the ash left behind.
|
So, one measure of ash would be the volume of the brick left behind. We calculated it to be about 32 cubic inches or about 500 milliliters. Yes, we remembered to deduct the volume of all the holes. On the other hand, if you shake the grill and let it all fall into the cooker's lower regions, it all crumbles. If you take that ash and actually measure the volume, it is about 350 milliliters. This gives you about 333 milliliters of ash produce per pound of charcoal. In previous testing, Kingsford briquettes produced about 241 milliliters of ash per pound. But really what matters is volume of ash produced per hour of burning. Trust us on the math here, but BBQ Brick produces 150 milliters of ash per hour, while Kingsford produces 185 milliliters per hour.
While the volume of ash is probably not all that important, as you will see in a later section, the odious ash production of Kingsford briquettes interferes with the heat production of the briquettes. The ash simply insulates the briquettes and keeps the heat in rather than radiating up to the food. As we have already seen, the BBQ Brick can keep a constant heat for quiet a long time without ash interfering.
Compared to Kingsford
We thought a good comparison to a Kingsford product would be a BBQ Bag. As opposed to a big old bag of Kinsgford, the BBQ Bag is self lighting and something you could take with you on a cookout, much like the BBQ Brick. No fuss, no muss. Well, actually.....
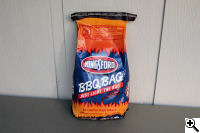
Kingsford BBQ Bag.
|

We have lit the Kingsford BBQ Bag.
|

"Houston, we have a problem. Looks like we aren't going to the moon with this one..."
|
Yes, we actually had a failure to ignite. We followed the instructions, but the bag just sort of halfway burned and then it all just went out. We suppose it might be that a bigger grill would have allowed us more room for airflow? We aren't really sure. A second bag that we lit did ignite.
But otherwise, how do these products compare? Well, the BBQ Bag has a number of minor annoyances. It smells of lighter fluid. You have a lot of paper ash flying around since you burn the bag. The paper underneath the charcoal doesn't burn which restricts airflow and makes the lighting take longer. After you spread the briquettes you can get the paper to burn up, but you also have renewed lighter fluid burning as briquettes are exposed to the air, so you have to let the briquettes burn longer until all the fluid is gone. Of course, you have the usual eye-stinging fumes from the charcoal as it ignites and the usual buildup of ash. But how does it perform compared to BBQ Brick in terms of heat production and burn time? We have superimposed the Kingsford graph on the BBQ Brick graph we showed previously:

(Note that in the case of the Kingsford BBQ Bag, we didn't start recording temperatures until the charcoal was ready to cook, thus the big spike up to 600 degrees. This was due to the fact that we didn't want to measure the temperature of burning lighter fluid. So, compare the two graphs from the 600 degree mark on down.)
It's pretty obvious that BBQ Brick burns hotter, longer and more consistently than the Kingsford BBQ Bag. It is also quite clear that the build up of ash on the Kingsford briquettes slowly insulates the briquettes more and more, causing the steady decline in temperature. Of course, we could have knocked the ash off (and we have in other testing) and restored the heat back up to a higher temperature, but of course, doing that just decreases the burn time even more.
Cooking Flavor
What about the flavor of food cooked over this charcoal. We did a side by side blind taste test of thinly sliced chicken breast meat cooked over BBQ Brick and cooked over Kingsford briquettes. One of us knew which was which and one of us didn't. The results were unanimous. Essentially we could tell no difference in the flavor of the chicken cooked over one or the other. Both tasted like grilled chicken, but with no real difference between the two.
Cost
We are going to have to play it a bit loose here on a cost comparison since it depends entirely on how much food you are going to cook, and how much charcoal you think you are going to need to cook that food. However, we think a fair comparison would be to think about how much charcoal would you want to use to cook in our test vessel, the Weber Smokey Joe. To be fair, the Kingsford BBQ Bag covered the entire lower grate with burning charcoal. To do the same with the BBQ Brick, you would need to place 2 bricks side by side, and then split a 3rd brick in half, placing one half in front and the other half in the back. So, the BBQ Bag costs about $4.00. 3 bricks cost about $7.50, definitely more expensive. You have to decide if the longer burn time and convenience of these bricks is worth the additional cost. If we do take into account the burn time and look at the cost per hour of burn time, the Kingsford BBQ Bag comes in at about $4.00 per hour. The BBQ Brick comes in at about $3.75, a much more palatable figure. So if you plan to cook for a longer period of time, the BBQ Brick looks much better.
Conclusions
So, where does this all leave us? BBQ Brick is a great convenient source of heat for grilling, especially for taking to the beach or the park for a cookout. It's easier to light and quicker to get cooking than with instant light briquettes, it burns longer with more consistent heat, and you don't have to take a bottle of starter fluid or a big metal chimney with you. While you might not want to spend the money to use this product for all your grilling (a big bag of ordinary briquettes is far cheaper in the long run), you can't beat this product for the times when you want simplicity, convenience and ease of use.
| 


