 |
|
Connecting To The CyberQ Wifi In Infrastructure Mode Infrastructure mode is the second wifi mode that you can use with the CyberQ Wifi. This is more like what you probably are accustomed to. It is like connecting your laptop or your wireless printer up to your home network. This mode will connect the CyberQ Wifi to your home network. This will allow you to do two things that ad hoc mode doesn't. First, you will be able to browse the web as well as look at the CyberQ Wifi without having to switch from one network to another. Second, as we'll show you in the next section, infrastructure mode allows you to connect to your CyberQ Wifi from outside your home network. For example, you will be able to view the CyberQ Wifi from your smart phone or from your office computer. So, here we go! First of all, connect to your CyberQ Wifi using ad hoc mode (see the previous two sections). This will be the easiest method to get the job done. Navigate to the Wifi Setup page by clicking on the link at the top of the Main Screen. You will then see the following screen displayed: 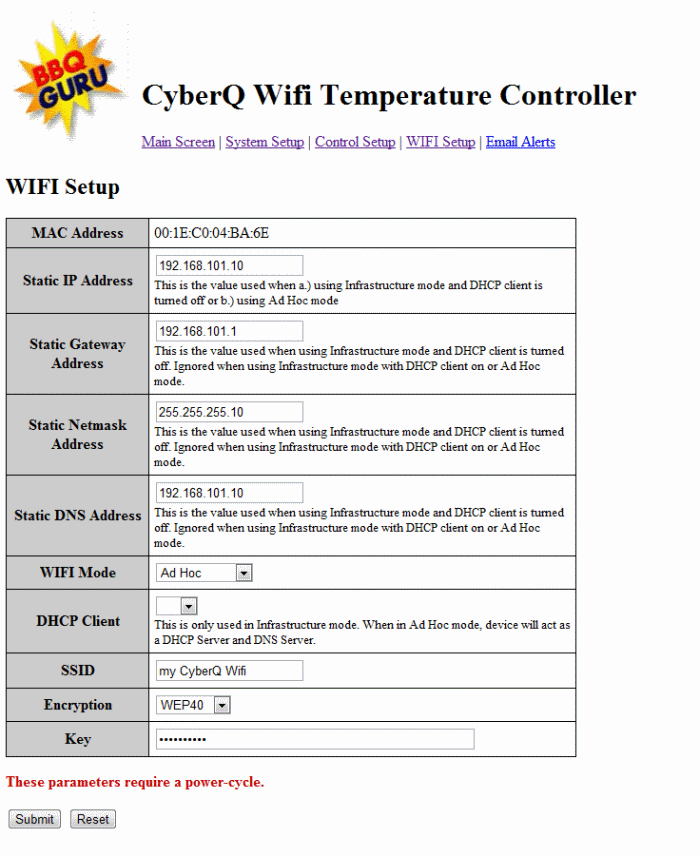 Set the following five parameters as shown in the next screen capture:
 Click on the "Submit" button and wait for the confirmation page to display. Then, to make the CyberQ Wifi put these new settings into effect, unplug the unit and then plug it back in. The unit will display the following when it comes back up:  This is telling you that you are in infrastructure mode (the "INFS" on the display) and that the CyberQ is not creating its own network ("NO NETWORK"). Also, immediately after you power it on, the five buttons will not be illuminated. After about 30 seconds, the CyberQ Wifi will connect to your home network and the buttons will start flashing. At this point, in order to connect to the CyberQ Wifi from any computer on your home network, you need to know the IP address that your router gave to the CyberQ Wifi. If you press the up and down arrows together for 3 seconds and enter the menu system, you can then press the right arrow one time and the unit will display the IP address it was given:  In our case, our router gave the unit the IP address 192.168.1.109. Whatever IP address is displayed by your unit, this is the address you need to enter into the address bar of your web browser. Here's how:  So, now you can access the CyberQ Wifi from any web-enabled computer or device on your home network. You can also access the internet from these computers at the same time. Now, the CyberQ Wifi is just like any other web site on the internet. Just put the IP address of the unit into your browser and you have access. On the next page, we'll show you how you can get to the CyberQ Wifi unit from your work PC or you smart phone! |
You can support this website by shopping at The Naked Whiz Website Store and Amazon.com
|

