 |
|
The item(s) contained in this review were purchased by The Naked Whiz website, using funds sourced from reader donations and web site advertising. No considerations, financial or otherwise, were given to or received from ThermoPro.
Introduction
The ThermoPro TempSpike gets a lot of mentions in BBQ groups, so we thought we would review it to see how it
compares to all the other truly wireless meat thermometers that we have reviewed. (Actually, we will be
reviewing the Twin TempSpike which has two meat probes versus the one probe of the TempSpike.)
If you aren't familiar with the term or concept of a truly wireless meat thermometer, let's
take a quick look at what these truly wireless probes are.
The first truly wireless meat thermometers were the MEATER line of products. They had no wires between the probe that is stuck into the meat inside of a cooker and the device outside the cooker that displays the temperature information. How did these probes accomplish this? By using Bluetooth to communicate between the temperature probe in a cooker and a smart phone or tablet running an App outside the cooker.
And you further ask, how did they do this without burning up the electronics? Oh, they were very clever, they were. By enclosing all the temperature-sensitive components inside the portion of the probe which is actually stuck into the meat, that's how. That portion of the probe will never get above the temperature of the meat, so neither will the electronics. The rest of the electronics which can tolerate the higher temperature of a cooker reside higher up in the shaft of the probe in the portion which is exposed to the high heat of the cooker.
So what does this mean for cooking meat? Well, no more wires, obviously. No more kinked wires. No more fried wires. And imagine what this could mean for users with rotisseries: no more opening the cooker, stopping the rotisserie and using a handheld thermometer to check the temperature of the meat.
Now that you know what a truly wireless meat thermometer is, let's take a look at the ThermoPro Twin TempSpike to see how it performs.
NUGGET ALERT: When reading this review, keep a look out for Nugget Alerts. These are nuggets of information about the product that you might wish to pay particular attention to because of their importance.
Specifications And Features
Let's look at the features and specifications
that can be gleaned from the ThermoPro website and owner's manual. The TempSpike Twin consists of three components,
the probes themselves, the Booster, and the TempSpike App.
For the probes:
A Photo Tour of the Twin TempSpike Base And Probes
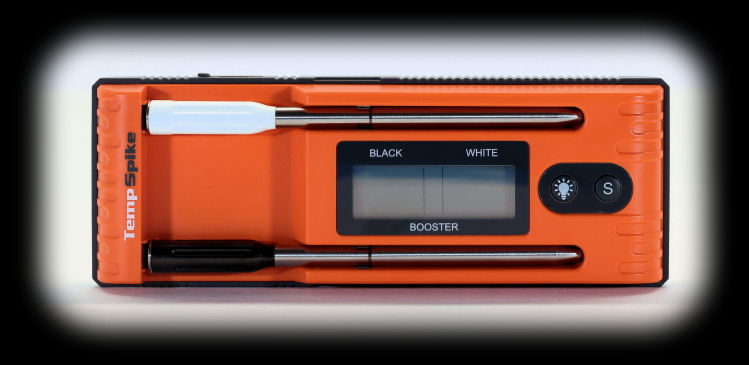
So now let's take a look at the Thermopro Twin TempSpike Booster and probes. First. the base unit, which
ThermoPro calls the Booster. It is made from plastic and comes with a clear plastic cover. It houses
the display, buttons, Bluetooth repeater, and charging circuitry. Oddly, it doesn't have any sort of stand
so you will have to lay it on its back or lean it up against something.
 |
NUGGET ALERT: Either probe can be placed in either charging slot. |
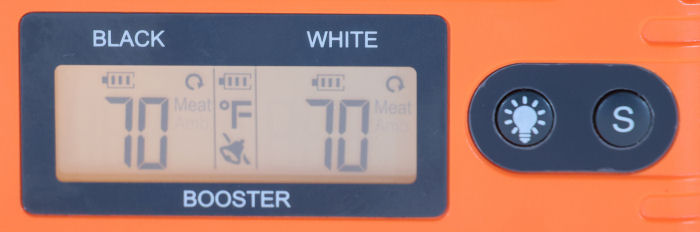
Next, we have a few more views of the booster. On the left, we see the charging electrodes that rub up against the tips of the probes. The next photo shows the charging electrodes that hold the shaft of the probes. The next photo shows a closeup of the booster's LCD display. And finally on the right, we show you the two-key keypad that contains the button that turns the LCD backlight on and off, and the "S" button that controls how temperatures are displayed.
Now let's take a look at the temperature probe:
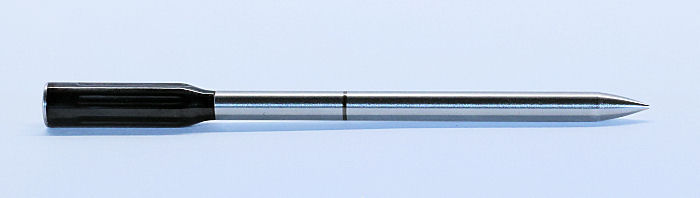
As you can see, here we have broken the probe down into thirds. The left third, or the top of the probe, contains the handle, the ambient temperature sensor (red dot) and the Bluetooth antenna. The middle third shows the "minimum insertion line" which is your guide to ensuring you insert the probe deep enough into the meat to protect the temperature-sensitive electronics. And finally, the right third shows the tip of the probe which houses the single internal temperature sensor. The approximate location is indicated by the red dot.
|
NUGGET ALERT:
For most brands of truly wireless temperature probes, it has always been vital that the
part of the probe which makes contact with the charger be kept squeaky clean so that
it can make electrical contact. If you have trouble cleaning your probe with soap and water, some |
|
NUGGET ALERT: Quite a number of people have reported over the years that with at least one brand of temperature probe, when pulling the probe out of the meat, the shaft of the probe pulls apart from the handle. The probe tends to stick to the meat at the surface due to juices solidifying and forming a bond between the shaft and the meat. We probably won't be able to determine if that's a problem with the TempSpike, but you can avoid this possibility by always remembering to first push the probe a short distance into the meat to unstick the probe, then pull the probe out. |
The Booster Display and Controls
The Display: The ThermoPro Twin TempSpike booster has a 1.875" x 0.625" (48mm x 15.9mm) backlit LCD display. It has three display modes, Meat Temperature, Ambient Temperature, or cycling between the two. The display mode is changed by pressing the "S" button.
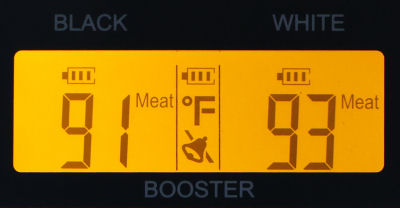
Booster display showing the meat temperatures. |
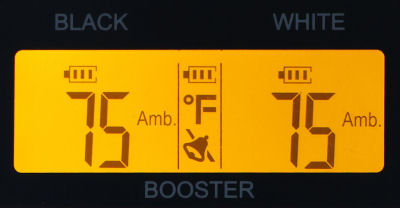
Booster display showing the ambient temperatures. |
Booster display cycling between meat |
And here is a diagram of the display with all the various elements identified:

The Controls: The booster also has two buttons on the front, the light button and the "S" button:
Pressing either button will turn the booster on. Pressing the light button will also turn on the display backlight.
The "S" button has several functions:
Resetting The Booster
You can reset the Booster to its factory settings by removing both probes from the Booster and pressing and holding
the "S" button for 10 seconds until a beep sounds. The device is now reset. The reset procedure could solve some
abnormal issues such as unstable connections, lost temperature data, etc.
Auto Power Off
When both probes are placed in the Booster for charging, the Booster will automatically turn off after 5 minutes
and the display will only show the charging status. When both probes are fully charged, the display will turn off
as well.
You can support this website by shopping at The Naked Whiz Website Store and Amazon.com
|

