 |
|
|
Click here for a printer-friendly version. |
I started roasting turkeys shortly after I got married in 1982. I initially learned how to roast them in a traditional manner from my mom and my wife’s Aunt Elsie. It was a great combination of old school European (mom) and southern country (Aunt Elsie). Over the years I stayed pretty true to tradition, but I spent a lot of time working to find the best way to achieve moist breast meat with fully cooked thighs. When I started Egging around 2000, I started the quest for the best possible roasted turkey on the Big Green Egg. I wanted to create that traditional roasted texture with just a hint of smoke flavor, not a smoked turkey. With the attributes of the moisture retention properties of the ceramic cooker, along with the rustic flavor of cooking over charcoal, I was able to achieve a great tasting, moist turkey. Over the years I have continued to tweak the method, always striving for great flavor and moistness. Now with the advent of Mad Max Turkey Seasoning, we have taken the traditional holiday turkey to a whole new level. Myself, along with Chris Capell and the whole Dizzy Pig team, hope that you enjoy the results.
Ok, here’s how I do it, but first a couple of disclaimers. One, I don’t brine my turkey. As I’ve stated before, there is no particularly good reason for this other than I’m too lazy to do it, or I don’t think about it in advance. Plus, I’m not sure I could find the refrigerator space for the container it would take. However, this should have no impact on if you want to brine and still follow the rest of my method/recipe. Second, while this method will usually result in fairly crisp skin, it is not my focus, however, it will look great as far as the final presentation. My goal is a turkey where the breast is done at the same time as the legs (more on that later), the meat has a great flavor, and there are drippings that will make for the best gravy you ever ate (after all, how many times have you had good turkey but crummy or pedestrian gravy?). And, when the gravy is really good, you will make a really memorable impression on your guests. This is a very traditional turkey that benefits from the magic of the Egg. All of this in my most humble of opinions, of course.
— “Mad” Max Rosen
I typically start with a fresh killed bird from the grocery, not necessarily organic or free range, but one which hasn’t been frozen like a rock for a year. When do I take the turkey out of the refrigerator and start the whole mad max turkey process? Here's a crude timeline of what happens leading up to actually putting the turkey into the oven or the Egg. I probably pull the turkey out of the fridge about 2 hours prior to going in the oven/egg. I open the package up, pull out the bird, pull the giblets and neck out of the turkey, and cut that excess glob of skin/fat off at the butt end. Then I pat down the turkey really well with paper towels to dry it off a little, set it up in the rack and pan. After that I take the giblets, neck and fat hunk and set up my stock pot for the day with the other stuff for the stock pot. Then I prep the inside of the bird, i.e. add the seasoning and the apple/onion/lemon. Next I go ahead and prep the butter paste. All this time the turkey is warming up from its initial refrigerator temps. If I'm finished ahead of my schedule, I just let it sit and wait for that point in time 30 minutes prior to cooking to finally put the ice bag on so that the thighs are having some time to warm from refrigerator temps.
But let's not get ahead of ourselves. Here’s everything you need:
Ingredients
- A Turkey (I like a fresh kill bird, but not necessarily a free range or heritage bird – they are expensive and I find them to be sinewy).
- Mad Max Turkey Seasoning
- 1 bottle white wine
- 1 pound of butter: 2 sticks for the turkey, 2 sticks for the gravy
- 2 onions
- 2 apples
- 1 lemon
- Some celery fronds
- Some carrots
- Gallon zip-lock bags
- Flour
- Roasting pan
- Stock pot (at least 4 quarts)
Editor's Note: Mad Max Turkey Rub is available from The Dizzy Pig Barbecue Company.
First, remember when you cleaned out the turkey and took out the neck, heart, giblets, liver, heart and that lump of fat? Put these into a large pot.
Add a halved onion, couple of stalks of celery, some carrots, and 2 to 3 tablespoons of the Mad Max Turkey Seasoning.
Now fill the pot to the top with water and let it simmer all day. This will be your stock for making the gravy. Let this
simmer all day long, adding water occasionally to keep the level up. This will do two things; 1. make your house smell
great all day long, and 2. create a wonderful rich stock for the gravy (which will be described later):
Back to the bird. Pat it dry, season the cavity with Mad Max Turkey Seasoning fairly liberally. Into the
cavity stick one small onion (halved), one half apple (quartered), and one lemon (halved). Take two sticks
of butter, softened. Take two tablespoons of the Mad Max Turkey Seasoning and mix it into the butter till you have a nice paste.
Put the bird in a roasting pan, breast up, elevated either on a v-rack or in my case I have a trivet-like metal piece that raises the
bird about 1 inch above the pan. Take the other two apple quarters and throw them directly in the roasting pan around the bird.
One. 20 to 30 minutes before you put it in the Egg (or oven), take a one gallon zip lock bag full of ice cubes and lay it over the breasts for the 20 to 30 minutes. What this does is lower the breast temps sufficiently that over the course of the roasting, the breast and thighs will be done at the same time. Over the years (and I’ve been doing the Thanksgiving turkey now for over 30 years), I’ve tried every trick in the book (paper bags, breast side down, terry cloth towels over the breast, etc.) and the ice bag absolutely works. I’ve been doing this now for about 20 years, and I’ve consistently had perfectly done, moist breasts finished right along with well cooked thighs. If you don’t do anything else, try this. Remove the bag of ice just before putting it in the Egg.
Two. Last steps prior to putting the bird in the Egg (or oven), take your Mad Max Turkey Seasoning and butter paste and liberally
apply it all over the bird. You can work some under the skin if you want to, but it's not necessary.
Then, open a bottle of white wine (most any good white will do), and pour half the bottle all over
the bird and in the cavity. DON’T drink the rest of the bottle, you will need it for the gravy.
Sometime before Thanksgiving, test out your setup. My first year I found that my roasting pan would not work with the grid on top of an inverted plate setter, it was just too high into the dome. I ended up borrowing a rig from Chris Capell that consisted of two metal bars and a pie plate that fit under the grid in its normal place on the fire ring. I kept the pie plate filled with water all day so as to create a good indirect heat barrier from my roasting pan, thereby avoiding any scorching of my drippings (this is key to having the good drippings for gravy).
The next year I did a setup of inverted plate setter with the little green BGE "feet” on top, and the roasting pan on top of the feet. The key here is to have a heat barrier and sufficient air flow under your roasting pan to avoid any scorching in the pan. I have an 80 year old aluminum oval turkey roasting pan that fits perfectly in a large Egg. This time of year, the grocery stores sell all kinds and sizes of metal pans. Figure out what you need to fit in the Egg. Note, if you are roasting your turkey in the oven, simply put a rack in a low position and put your roasting pan on the rack.
Editor's Note: The cast iron plate setter shown in the following photo is available from Innovations By Chance.
Other setups that work include using a ‘spider’ with a pizza stone and then the grid, or the spider/pizza stone with an adjustable rig
setting the roasting pan on the bars in their lowest setting.
Editor's Note: Spiders and Adjustable Rigs are available from The Ceramic Grill Store.
I set up as full a load of lump as I can (almost to the top of the fire ring, there is maybe a 1-inch gap between the lump and the bottom of my plate setter). I added one good chunk of apple wood (other good woods are peach and pecan). I didn’t want a ‘smoked’ turkey. When it was done, the turkey had a nice hint of smoke. It’s your call as to how smokey you want yours to taste but remember, a turkey will absorb a lot of smoke, so take it easy. I got a good established fire going at 325°F. I let it burn for about 45 minutes prior to putting the turkey in. I found that a full load of lump at 325°F lasts only about 8 hours, so for a 20+ pound bird, it gets a little close.
My turkey weighed in at around 14 pounds. At 325°F it took a good 4 hours to be done. During the cook I regularly basted it with a bulb baster (about once every 20 -30 minutes after the first hour) using the drippings and wine and butter that collect in the roasting pan. If using a water pan for a heat barrier regularly check the water pan underneath the roasting pan to insure it stays full of water. When the skin started browning, I tented it loosely with aluminum foil until about the last hour, when I removed the foil to let the skin crisp up and come up to the color I wanted (a nice deep golden brown). I didn’t check temps until the last hour or two. (You are looking for 160°F in the breast and 180°F in the thighs.) Even then, I pulled the turkey out when two things happened. First, when a deep poke in the thigh and breast resulted in clear juices running, and second, when the drumstick rotated freely at the joint (hey, this is how my mom and Aunt Elsie taught me to do it).
When you pull the roasting pan and turkey from the egg and you’re removing the turkey from the roasting pan, first tilt the bird up so that all the juices in the cavity pour out into the pan (you do NOT want to lose this). Put you bird aside on a cutting board or platter and cover it with foil until ready to carve.
So, how do you make great gravy? Its really pretty easy, particularly at this point because you have created all the wonderful ingredients that you really need to do it.
Here is what your pan will look like, with the all the dripping in it. Also, discard the apple that was in the pan all through the roasting. Note, that dark stuff you see is not burnt. It is well browned and will affect the final color of your gravy, but trust me, this is where all the real flavor is. Note – depending on how dark the drippings end up being will determine how dark your gravy turns out. Sometimes it's lighter, sometimes darker. It will be fantastic either way.
Now, pour the contents of this pan into a bowl or large measuring cup. In this case, I’ve gotten
about 2 full cups of liquid from the pan. Let it sit for about 5 minutes so that the fat separates from the good drippings.
Using a ladle, gently remove the fat (DON’T throw it away) and leave just the dark pan juices.
You now have your bowl of crud drippings to be used in the gravy. Its beautiful, dark and rich in flavor. This is the true key to your gravy.
Now, you are really ready to make the gravy. Take your pan and place it over a burner (in this case both front and back burners) on high heat.
Add two sticks of butter (or if you have enough turkey fat from the pan use it for even a richer gravy) and whisk it hard, pulling up as much of the pan crud (aka fond) as possible. All through this process you need to be constantly whisking in order to avoid any burning or scorching. As the butter melts and you dislodge the fond from the pan, it will be bubbly and brown.
Now start adding flour (anywhere from ½ to 1 cup) in equal amounts to the butter/fat. Keep whisking and working it in till it’s a bubbly, pasty texture.
Keep whisking that flour/butter/crud mixture until you have a nice smooth roux. There should be no lumps of flour.
After about 4 – 5 minutes it should be thick and smooth.
Now, remember that ½ bottle of wine you were saving (you did save it didn’t you?)? Add the wine to the roux in the roasting pan. You should still have it on a high flame, so the alcohol will boil off quickly. Keep whisking. The key to a nice smooth lump-free gravy is to whisk the roux until it's lump free and then keep whisking the other ingredients in so that it stays nice and smooth. Because of the high heat, it will be constantly bubbling, this is why you have to keep whisking, so it doesn’t scorch or burn.
Next step, remember that bowl of crud/liquid you saved from the pan and separated from its fat? Once the wine has been mixed in,
and reduced about ¼ to ⅓, add in this liquid. This is the true key to the gravy, it imparts so much great flavor.
One year, I had the bowl of crud in my sink, and while I was doing other stuff, some do-gooder (my sister-in-law I think,
although no one ever fessed up) threw it down the sink thinking they had done me a favor. I almost killed somebody.
Now that you’ve mixed in the crud, remember that stock you’ve been cooking all day? Start ladling that into the pan, one
ladle at a time, continuing to whisk it in. Keep the heat on, bring it all to a boil. Keep adding stock till you have
the desired thickness where you want it.
Now is the time to add a little extra Mad Max Turkey Seasoning to get the final layer of flavor set.
Now, take the neck, giblets, heart and liver from the stock pot. Remove the meat from the neck (you’ll be amazed how much meat there is).
Chop it all up (meat, giblets, heart and liver) very finely and add it to the gravy.
It’s ok to feed a little of this to the dog(s), they love it.
Second, in a small bowl, mix some of the stock with some flour to create a thickening agent. By doing this in a separate bowl, you avoid
the problem of adding flour directly to the gravy with the intention of thickening it but in reality, you’ll be creating lumps.
If the gravy is too thin for your tastes, you can stir in some of this thickening agent till you get the gravy you want.
Too thick? Simply add some more stock.
Final note, this gravy will not look like the creamy stuff from a jar, nor is it intended to, but I’ll bet it’s the best you ever had.
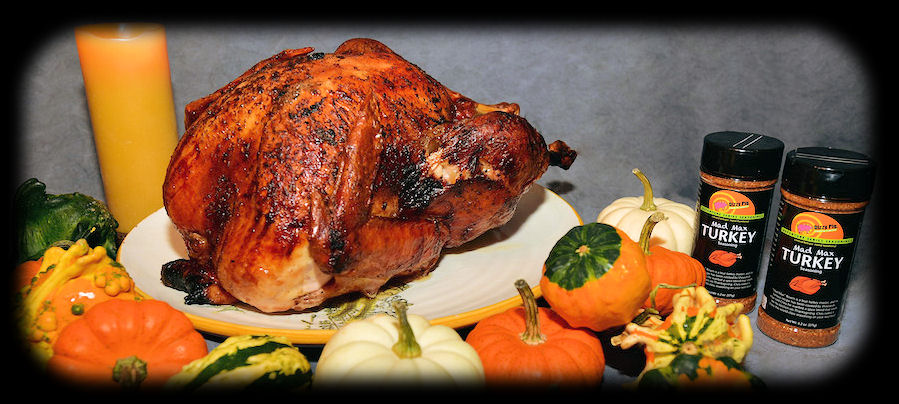
So, here’s the finished product; succulent, moist, juicy turkey with all the great flavor added by roasting in the Big Green Egg, and the best tasting gravy you ever had, all enhanced with the addition of the Mad Max Turkey Seasoning.
You can support this website by shopping at The Naked Whiz Website Store and Amazon.com
|

