|
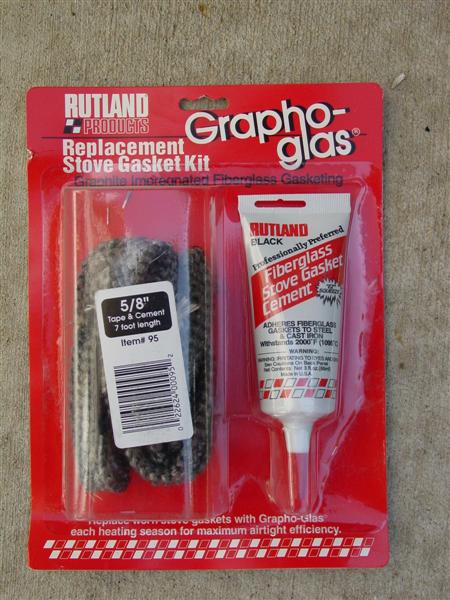
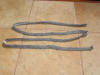
 The Rutland gasket kit you want is the 5/8" flat 84" one and includes the
adhesive needed. You can get these at Menards for about $6.00. You
may be able to find the gasket in bulk in fireplace shops. You want the 5/8
flat, *not* the rope and the 84" is ideal length as I'll explain later. If
buying it in bulk then make sure you buy the grayish-black gasket versus the
white if at all possible. Also, if buying separately, be sure to get the Stove Gasket Cement and *not* Black Furnace Cement. NOTE: Ron still sells the kits pictured on this page for $11. You can contact Ron by posting on the Original Big Green Egg Forum.
The Rutland gasket kit you want is the 5/8" flat 84" one and includes the
adhesive needed. You can get these at Menards for about $6.00. You
may be able to find the gasket in bulk in fireplace shops. You want the 5/8
flat, *not* the rope and the 84" is ideal length as I'll explain later. If
buying it in bulk then make sure you buy the grayish-black gasket versus the
white if at all possible. Also, if buying separately, be sure to get the Stove Gasket Cement and *not* Black Furnace Cement. NOTE: Ron still sells the kits pictured on this page for $11. You can contact Ron by posting on the Original Big Green Egg Forum.
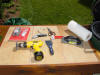 Here is a picture of all of the parts you will need to install your gasket.
Note that while Mike Brown used a rotary wire brush, RRP strongly discourages that based on failures experienced by other people. As the wire wears down it fills the minute pores of the ceramic and the edge becomes burnished to a slick polished surface that will not allow the adhesive to bond.
Instead, use a 3M product called "Paint & Rust Stripper" that is attached to a 1/4" electric drill.
Here is a picture of all of the parts you will need to install your gasket.
Note that while Mike Brown used a rotary wire brush, RRP strongly discourages that based on failures experienced by other people. As the wire wears down it fills the minute pores of the ceramic and the edge becomes burnished to a slick polished surface that will not allow the adhesive to bond.
Instead, use a 3M product called "Paint & Rust Stripper" that is attached to a 1/4" electric drill.
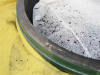
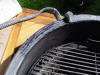
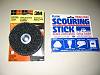 First you need to clean off the old gasket and
that can be a real task. 3M makes
a paint stripper that will fit the drill. The remover is real coarse
looking, but does a wonderful job without damaging the ceramic edge.
First you need to clean off the old gasket and
that can be a real task. 3M makes
a paint stripper that will fit the drill. The remover is real coarse
looking, but does a wonderful job without damaging the ceramic edge.
 To make the edges perfect pick up a pumice stone in the cleaning supply section of
the store too and that will even get the minute parts off the edge.
Perhaps this is personal, but I'd rather use the pumice stone and
elbow grease than to ever use acetone, MEK or any other chemical on that porous
edge.
To make the edges perfect pick up a pumice stone in the cleaning supply section of
the store too and that will even get the minute parts off the edge.
Perhaps this is personal, but I'd rather use the pumice stone and
elbow grease than to ever use acetone, MEK or any other chemical on that porous
edge.
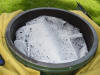 Note that the cleaning WILL make a mess.
Protective glasses may be a good idea. Since you'll be building a fire in a
little while to cure the glue go ahead and put some lump in and then place old
towels, gunny sacks or whatever on top your grate to keep the dirt, dust and
crude from falling in to your lump and thus creating a horrible smelling fire
later.
Note that the cleaning WILL make a mess.
Protective glasses may be a good idea. Since you'll be building a fire in a
little while to cure the glue go ahead and put some lump in and then place old
towels, gunny sacks or whatever on top your grate to keep the dirt, dust and
crude from falling in to your lump and thus creating a horrible smelling fire
later.
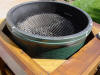
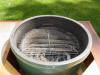 Here is the completely cleaned base.
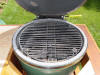
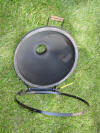 Here is the completely cleaned lid.
NOTE: I did NOT put the Rutland on the lid/top - just the bottom
portion of the cooker is sufficient, as the thickness of this Gasket is enough
to seal the gap.
Here is the completely cleaned lid.
NOTE: I did NOT put the Rutland on the lid/top - just the bottom
portion of the cooker is sufficient, as the thickness of this Gasket is enough
to seal the gap.
 Take your gasket and fold it in half and mark the center with a
piece of masking tape and then do that again and mark those points as well so
your gasket is now marked in quarter lengths. This will make sense in a
minute.
Take your gasket and fold it in half and mark the center with a
piece of masking tape and then do that again and mark those points as well so
your gasket is now marked in quarter lengths. This will make sense in a
minute.
 Mark the four "corners" of your egg with masking
tape. This way as you move the gasket around you can compare the marks on
the gasket to see if you are using the correct amount (more detail below).
Mark the four "corners" of your egg with masking
tape. This way as you move the gasket around you can compare the marks on
the gasket to see if you are using the correct amount (more detail below).
The gasket is fiberglass and can be a bear to
trim neatly but if you'll take your time with a sharp knife or razor it can be
done. Be sure to not waste any gasket at this point. Even though the
circumference of a large BGE is only 67 " versus the 84" in the kit when you get
done "bunching" it back on to itself you'll only have a couple inches of scrap.
The tape marks on the gasket and egg will be helpful as a point of reference of
just how compressed your gasket should be in relation to where you are on the
edge. Get it? 12:00 to 3:00 is one fourth etc. I even took a board and
measured off 67" and then took the time to bunch (or compress) the braid back
into itself to compress the 84" back to 67" so as to get a feel for what it
should look like. This added work could probably be skipped as long as you
know that the proper compression will mean that the 5/8" gasket will broaden
enough to cover the entire width of your BGE's edge which is about 1-1/4".
 It doesn't take long, but I'd suggest you make sure you
won't have interruptions because the glue doesn't have a long open time.
Starting at the back center spread some glue neatly on the edge. I
buttered the edge for say 4"-5" at a time as I went and used a serrated blade so
there would be no pools of adhesive to ooze out, nor too much to impregnate the
gasket either as it has to stay flexible. When I say serrated I mean
trowel like so there is a uniform amount of glue applied. A fine
applicator would be an old sabre saw blade for wood with say 4 teeth per inch.
It doesn't take long, but I'd suggest you make sure you
won't have interruptions because the glue doesn't have a long open time.
Starting at the back center spread some glue neatly on the edge. I
buttered the edge for say 4"-5" at a time as I went and used a serrated blade so
there would be no pools of adhesive to ooze out, nor too much to impregnate the
gasket either as it has to stay flexible. When I say serrated I mean
trowel like so there is a uniform amount of glue applied. A fine
applicator would be an old sabre saw blade for wood with say 4 teeth per inch.
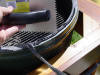 I actually had a trowel lying around, and used this.
It seemed to work just fine.
I actually had a trowel lying around, and used this.
It seemed to work just fine.
Now press the compressed gasket into the wet glue
and if it covers the whole edge press it into the glue. Using a small flat
piece of wood covered with wax paper isn't a bad idea, although I used a J
roller designed for wallpaper or pressing Formica onto counter tops. Just
keep going like this four or five inches at a time until you get to your quarter
way point with masking tape. By then you'll have the hang of what it
should be looking like for sake of consistency.
 When you get back to the starting point make a clean cut for butted ends and that's
that. If you're the adventuresome type you could make your ends fit
diagonally (like I did), but that also means more exposed ends. You'll
probably have at least one half the glue left.
When you get back to the starting point make a clean cut for butted ends and that's
that. If you're the adventuresome type you could make your ends fit
diagonally (like I did), but that also means more exposed ends. You'll
probably have at least one half the glue left.
 Now
when you're satisfied you have pressed the gasket down well and no glue has
oozed out the sides which need to be cleaned up before curing close the dome to
provide uniform weight on the edge. Lift it and if nothing stuck to the
top you're ready to remove your towels et.al. and start a fire. A low 225
to 250 for a couple hours should do it.
Now
when you're satisfied you have pressed the gasket down well and no glue has
oozed out the sides which need to be cleaned up before curing close the dome to
provide uniform weight on the edge. Lift it and if nothing stuck to the
top you're ready to remove your towels et.al. and start a fire. A low 225
to 250 for a couple hours should do it.
Troubleshooting Tips
RRP has stated that in correspondence with people who have had problems the application errors most in common were:
- The use of a rotary wire brush
- Not kneading the tube of adhesive first and squirting out until no watery appearance or the adhesive was old and thick. It must be fresh and tacky.
- Spreading out more than 4" to 6" at a time.
- Moving the gasket after first embeded - if you need to, then squirt more adhesive, but once the bond is broken you need more and quickly.
- Working in either direct sun or in rain because it is a latex product.
- Using out of date adhesive. The Rutland adhesive has a shelf life of 18 months from date of manufacture. To assure you have good product check the small code embedded in the crimped end of the adhesive tube. It is visible even in the bubble wrap. The first two digits are the day of the month of production. The third is a letter whereby B = 2003, C = 2004 and D = 2005 etc. The next two numbers represent the month and the last letter is the batch that particular day. Now add 18 months to that date of production and you will know if the product is still fresh.
|