The BBQ Guru Pitminder NanoQ is the latest member of what has become an ever-growing family of digital barbecue temperature controllers from the folks
About BBQ Guru
The BBQ Guru has become a household name amongst the BBQ community, but if you haven't heard of them, they make devices that monitor the temperature of your cooker and then adjust it and control it by controlling the airflow through the cooker. Airflow is controlled by means of a blower attached to your cooker. By turning the blower on and off as required, these temperature controllers can keep your cooker within a few degrees of a set temperature as long as there is fuel to keep the fire going. In addition, some models monitor the temperature of your food and alert you when the food is done.
|
at The BBQ Guru. It is a companion to the very popular DigiQ II, CyberQ II and ProCom 4 models. The NanoQ now introduces digital temperature control to the low end of The BBQ Guru product range, replacing the original PitMinder analog controller. And while it replaces the existing function of the PitMinder, it also brings new function to the pit-only temperature controller.
Along with bringing the PitMinder into the digital age, the NanoQ adds Adaptive Control and Open Lid Detect to the PitMinder, features that owners of models such as the DigiQ II are familiar with. It also brings to the table greater temperature range, a better and more rugged temperature probe and few other minor improvements.
In this review, we'll be using the NanoQ along with a Pit Runner 4 CFM blower, whereas in reviews of other BBQ Guru products, we have always used the 10 CFM Pit Viper blower. Since the NanoQ is intended to be the low end/low price option in the BBQ Guru line, we thought we keep the price of the tested package low by using the smaller blower. Of course, you can choose whichever blower size makes sense for your application.
Features
Here is the list of features as listed in the NanoQ owner's manual:
- User-friendly simple pit temperature control
- Setpoint Capture Feature sets your setpoint to the read temperature
- Adaptive Control Algorithm learns your pit for optimal control
- Open Lid detect reduces temperature fluctuation and overshoot
- Exclusive magnetic mount
- Real-time blower status indication
- 50 to 475 deg F range with +/- 5 deg F accuracy
- Runs on 100-240VAC (for worldwide use) or 12VDC for automotive supply use
- Rugged, armored high-temperature pit probes
Plus we'll add a few more of our own:
- Rugged metal case (we proved how rugged the CyberQ II was by dropping it as soon as we got it. The NanoQ case is the same type as the DigiQ II and the CyberQ II.)
- Built-in high intensity white LED that serves both as an indicator and a mini-flashlight.
- Available in an array of colors (helps to distinguish units and of course, can match your bag and shoes!)
Compared To The Analog PitMinder
The following table shows you a comparison of the specifications for the new digital NanoQ PitMinder versus the older analog PitMinder. As you can see, the new digital NanoQ is quite an improvement over the older analog PitMinder:
| |
The NanoQ PitMinder |
The Analog PitMinder |
| Pit Temperature Range |
50° - 475° F |
90° - 370° F |
| Temperature Control Accuracy |
±5° F |
±6° F |
| Pit Temperature Adjustment |
Button with 5 degree increments |
Dial with 25 degree markings |
| Power Loss Recovery |
Yes |
Yes |
| Probe Type |
Thermocouple |
Thermistor |
| Probe Cable |
Armor braid w/ fiberglass insulation |
Teflon-coated wires |
| Probe Maximum Temperature |
1000° F |
400° F |
| Open Lid Detect |
Yes |
No |
| Adaptive Control Algorithm |
Yes |
No |
| Pit Temperature Capture |
Yes |
No |
| Blower Running Indicator |
Yes, red LED |
Yes, red light |
| Integrated Flashlight |
Yes |
No |
| Power Options |
120-240 VAC or 12 VDC |
120 VAC or 12 VDC |
| Price (Note 1) |
$184 |
$183 |
- Pricing assumes the purchase of a system unit, a Pit Runner 4 CFM blower and an adapter for a large Big Green Egg.
|
Compared To Other BBQ Guru Controllers
The NanoQ is intended to be a simple, low-cost temperature controller. The following should be obvious, but we'll point it out anyway. There is no food probe or food temperature monitoring as in the other controllers. Therefore, there is no Ramp Mode. No wireless, no dual-cooker control, no USB connection. This simple little unit controls the temperature of your cooker and that's it.
The Basic System
Here's what comes with a basic system:
- The NanoQ system unit with cloth carrying bag
- Pit temperature sensor
- Power supply
- A piece of foil tape for sealing leaks
- A small probe cleaning pad
- A kill plug so you can remove the fan and plug the door adapter
- A package of over 7 Curl-Eez for organizing probe wires
- Printed User Guide
Then here's what you need to add to complete your system:
- Blower adapter door
- 4, 10 or 25 CFM blower
When you order your system, you specify the size of the blower that you want, the type of door adapter you need and the color of your system unit. The blower and door adapter are priced separately to the system unit.
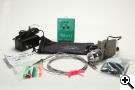
The basic BBQ Guru NanoQ system major components. (Door adapter not shown)
|
The System Unit
The system unit is a small box about 2.25" x 3.0" x 0.8" in size which weighs in at about 5.75 ounces. It is almost exactly the same size as a 1.5 oz box of raisins. It is housed in a rugged metal case and it feels solid in your hand. We can attest to the ruggedness of the housing used on all the current BBQ Guru controllers as the very first thing we did when we got our CyberQ II was to drop the unit on the floor from about four feet. Doh! The unit is still working just fine. The housing is water resistant, and it appears that as long as the unit is kept upright, it should survive pretty wet weather. There is also a small hook on the back of the unit for hanging it from a nail. (We hear that there is a magnetic mount in the works, but it is not available as of the time of this review.) Here we show various views of it:
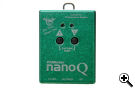
Front view
|
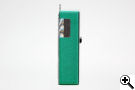
Side view
|
Back view
|
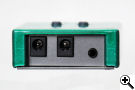
Bottom view
|
All the controls are on the front panel, while all the plugs for power, blower and probe are on the bottom.
There is no stand for the NanoQ like there is for the other larger controllers. You can hang it from a hook on your table or stand, you can just lay it on a table top, or use the new magnetic mount once it becomes available.
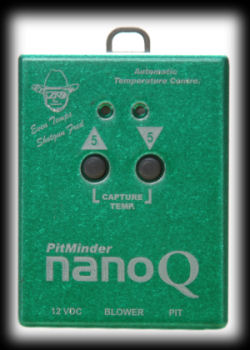
Controls and Display
Let's look at the front panel details. In the photo below, you can see that the NanoQ has two LEDs and two buttons. That's it!

First, the LEDs. The LED on the left is a high-intensity white LED, while the LED on the right can display either red or amber:
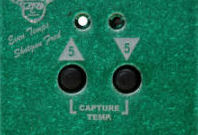
The white Utility LED |
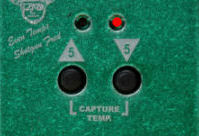
The red Blower Status LED |

The amber Error LED |
The LED on the right indicates either the blower status or errors:
- Red indicates that the blower is energized, i.e., blowing air into the cooker. Normally, this LED will be flashing red on and off as the blower is operating with its on/off cycle.
- Yellow flashing rapidly indicates an error when the pit probe measures over 485° F, the pit probe is bad, or the pit probe is not plugged in.
- Yellow flashing slowly indicates that the NanoQ is set for a target pit temperature of 475° F. (Note that if the blower is going AND you have the unit set to 475° F, the LED will show red, but briefly flash yellow to indicate that the unit is set to the maximum setting. It will alternate between red and yellow as long as the blower is operating.)
The white LED on the left has a number of functions:
- The white LED serves as a power indicator, showing when the unit is powered on.
- It blinks off to indicate a button press.
- It blinks off to indicate that the set point has been set to 225°, 475°, or the current pit temperature has been captured and set as the new set point.
- It briefly flickers to indicate that a new set point has been successfully stored in the unit, 10 seconds after a button is released. (You have to keep a sharp lookout for the flicker, though, as it quite subtle.)
- It serves as a small flashlight for cooking in the dark!
Finally, when the unit is first powered on by plugging the power supply into the unit, the LEDs will display the following pattern: Red, White, Yellow. The white LED will then display continuously (indicating the unit is powered on) and the red/amber LED will eventually start to display as described above.
As for the buttons, there are two; an up button and a down button. Using them is simple:
- Pressing the UP button increases the pit set point by 5 degrees.
- Pressing the DOWN button decreases the pit set point by 5 degrees.
- Pressing them both together and holding them for 1 second then releasing changes the pit set point to the temperature currently being sensed by the temperature probe.
- Pressing them both together and holding them for 3 seconds then releasing changes the pit set point to 225° F.
- Pressing them both together and holding them for 5 seconds then releasing changes the pit set point to 475° F.
Note that if press the UP and DOWN buttons together in order to set the pit temperature to 225°, 475° or the current temperature, the white LED will blink off briefly after 1, 3 and 5 seconds to let you know where you are in the cycle of setting the temperature. So if you want to set the pit temp to 225°, for example, press and hold the UP and DOWN buttons together. The white LED will blink off once after 1 second, then blink off once after 3 seconds. This is your signal to release the buttons. If you keep pressing the buttons and the white LED blinks off again after 5 seconds, the pit temperature will be set to 475° when you release the buttons.
We'll talk about the Open Lid Detect feature later on, but you also use the buttons to enable and disable Open Lid Detect. The unit comes with Open Lid Detect turned on. To disable or enable the feature:
- To disable Open Lid Detect, press the DOWN button while powering on the unit, then release it after 1 second.
- To enable Open Lid Detect, press the UP button while powering on the unit, then release it after 1 second.
|


