 |
|
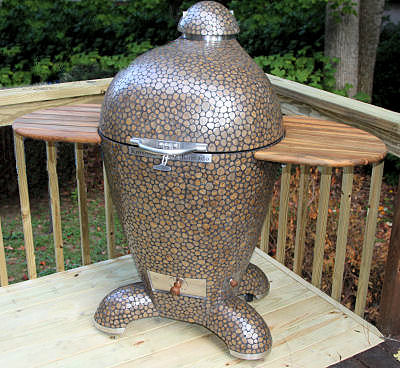
Photo Tour of the Komodo Kamado Cooker, Part 1
Now it's time to sit back and put your feet up while we take you on a photo tour of the Komodo Kamado 23-inch OTB Gen 2.4 Ultimate cooker. This is going to take a while because there is a lot to show you. So, in no particular order, let's start with the latch mechanism and handle.
The Handle and Latch Mechanism: The handle and latch mechanism is all made from 304 Stainless Steel and is an attractive sight on the front of the cooker. The name "Komodo Kamado" is proudly etched into one of the body plates. The handle is sturdy and easy to grab. The latch is easy to work and it has two positions. You just pull the lid down close to being shut and the press the latch towards the cooker to the first position and the lid will be held down, but you won't have an airtight seal. Yet. Press the latch handle firmly towards the body of the cooker and it will snap tightly into the second position and now you have a nice airtight seal. If you find your lid is not closing as tightly as it should, you can adjust the lower portion of the latch mechanism by loosening the two nuts that hold the lower plate, moving the plate down a bit and then tightening the nuts.
The Top Vent: Next, let's look at the top vent. It is an elegant all-in-one solution that combines the concept of a rain cap and top vent. The vent allows you to precisely control the size of the opening. It also keeps rain from getting into the cooker while you cook. The top vent spins on a threaded rod so that it opens and closes. You control airflow through the cooker using this top vent and the lower vent that we'll see later. Opening the vent wider by spinning the top allows more air to flow. It has two "ears" on it to make turning it easier. They also give you a nice reference point for when you want to rotate the top a specific amount. The threaded rod has square Acme threads on it which are stronger than the normal v-shaped threads on most screws. There is enough play between the threaded rod and the threaded sleeve that even if the 304 stainless steel should get corroded or covered with cooking gunk, the top spinner is not going to get frozen so that the top won't spin. The threaded sleeve that holds the rod has been lengthened to reduce the amount of wobble when you turn the top.
Side Accessory Plates: On each side of the cooker, you will find a side accessory plate. The plate on the right side has an opening to allow access to the rotisserie bearing. (More on that later.) The plate on the left is has no such opening. These plates allow you to attach a rotisserie motor bracket, side tables or other accessories to the cooker. If perchance you decide not to order side tables, or not use the grid hanger or tool hangers or a rotisserie motor, you won't be attaching anything to the side accessory plates and they will appear as in the following photos:
Later on in the review, we will show you the side tables we ordered and how the side table brackets attach to the side accessory plates.
The Lower Vent: Down below, you will find three openings into the cooker, the main lower vent, the BBQ Guru port, and the rear gas accessory door. The main lower vent controls airflow in two ways. First, you can rotate the knob and adjust the size of the openings created. Second, you pull the entire vent door out in order to create a larger opening and thus more airflow. (However, we think you will seldom find that necesary. With the dial fully open, we were able to get our cooker to 750°F by adjusting the top vent. We don't know how high it would have gone as we didn't open the top vent to its maximum opening.) The vent door has two rods on it that slide into two tubes mounted on the lower vent frame. They are tensioned at the factory so as to allow for a nice airtight fit. Also, the dial is spring loaded to keep tension on the dial so that it doesn't bind, but also doesn't move on its own.
The BBQ Guru/Stoker Port: The cooker also comes with a built-in port for a BBQ Guru temperature controller, or with appropriate adapter, a Stoker controller. To use it, just pull the plug out and insert your BBQ Guru blower into the inducer sleeve.
The Gas Accessory Door: The remaining door is for the optional gas accessory, which we did not purchase. To use it, you just remove the door and insert the gas burner. As you can see, there are two rings mounted in the floor of the cooker to hold the support legs for the burner.
Legs and Casters: Proceding to the bottom of the cooker, we find four legs, each resting on a hard rubber caster and protected by a stainless steel guard.
The Hinge and Spring Assembly: Around back, we come to the massive hinge and spring assembly, all manufactured from CNC laser cut, digitally folded then tig welded 304 stainless steel, and a massive galvanized heat treated, high carbon rear hinge spring. The spring is covered by a 304 stainless steel cover which is held in place by two pins and two aircraft allen head stainless steel bolts. Yes, 304 stainless steel. This is a massive improvement over the previous fibreglass covers.
As you can see below, the top of the spring is attached to the upper part of the hinge, while the bottom of the spring is attached to a bolt which runs through a pivoting plate. By tightening and loosening the bolt, you adjust the tension on the spring and thus the force required to hold the lid down. This of course also determines how fast the lid opens. You want to adjust it so that the lid is easy to close, but will stay in the full open position. Also, you don't want too much tension on the spring so as to cause the lid to fly open too fast.
You can support this website by shopping at The Naked Whiz Website Store and Amazon.com
|

