The Fireboard Spark
Instant-Read Thermometer


The Display

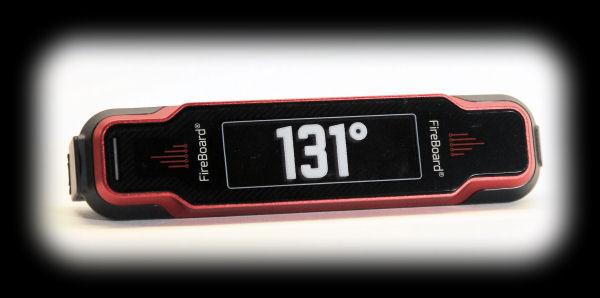
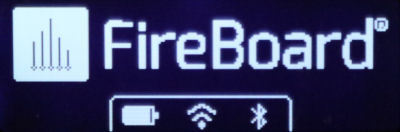
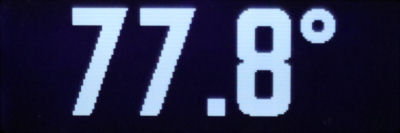
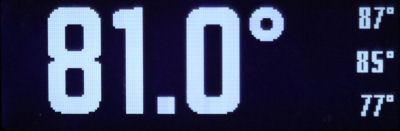
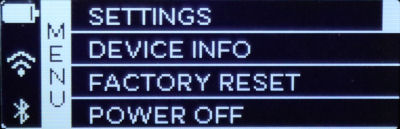
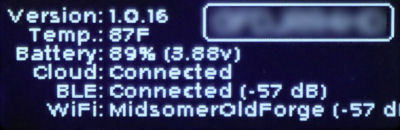
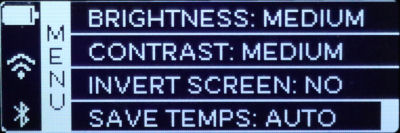
The display on the Fireboard Spark is a ⅞" x 2-9/16", 192 x 64 pixel backlit LCD, with autorotate and manual brightness and contrast adjustments. When displaying instant-read or external probe temperatures, the display will rotate in 90° increments. When is SyncMode, the display only rotates in 180° increments.

Here are all the various screens that you might see on the display:

Home Screen: This is what we'll call the "Home Screen" which displays when you first turn your Spark on. Across the bottom, you'll find the icons showing the battery level and the state of the Wi-Fi and Bluetooth connections.
Instant-Read Temperature Screen: This is the screen that displays when you are using only the instant-read probe to take temperature measurements.
Instant-Read Temperature Screen: This is the screen that displays when you are using only the instant-probe to take temperature measurements, and you press the Function Button to record measurements. Temperatures are only shown in whole degrees, regardless how you have set the "Decimal" setting.
External Probe Temperature Screen: This screen is what displays when you are using only the external probe to take temperature measurements. Looks amazingly like the instant-read probe screen, doesn't it? Hopefully, you can tell if you are using one or the other.
External and Instant-Read Probe Temperature Screen: This screen displays when you are using both the external probe and the instant-read probe to take temperature measurements at the same time. Obviously, the number on the left is the external probe reading and the number on the right is the instant-read probe reading.
SyncMode Temperature Screen: When SyncMode is on and there is another Fireboard device active, this screen will display to show the temperatures on the Fireboard device. The screen will slowly scroll through any probes that are active on the Fireboard device. However, if you open the instant-read probe or plug in an external probe, this screen will be overridden by those probes and not display.
Menu Screen: If you are at the Home Screen, press and hold the Function Button, the menu opens up. A short press of the Function Button will then scroll through the items on the menu. A long press of the Function Button will select the highlighted menu item. You can either open the Settings menu, display Device Info, do a Factory Reset or power off the Spark.
Device Info Screen 1: Selecting the Device Info option from the main menu will display this screen which contains information about your Spark. It is all pretty much self-explanatory. While this screen is displaying, a brief press of the Function Button takes you to the second screen of the Device Info.
Device Info Screen 2: Pressing the Function Button briefly while displaying Device Info Screen 1 will take you to this screen which displays some regulatory information. A brief press of the Function Button will return you to the Home Screen.
Settings Menu, Part 1: Selecting the Settings option on the Main Menu will take you to the top half of the Settings Menu. Again these options are pretty self explanatory although we will go into more detail later on. A brief press of the Function Button will scroll through the menu, while a long press will toggle the current setting. Doing nothing for 3 seconds will return you to the Home Screen.
Settings Menu, Part 2: This is the second or bottom half of the Settings Menu which contains three more options that you can select. Again, a brief press of the Function Button will scroll through the menu, while a long press will toggle the current setting. Doing nothing for 3 seconds will return you to the Home Screen.


The LED

The Spark has a single multi-color LED on the left side of the unit which is used to convey a number of bits of information, including the battery charge level while charging, temperature readings recorded, NFC tag recorded, and Wi-Fi and Bluetooth connections established:

Green, single flash Wi-Fi connection is established.
Blue, single flash Bluetooth connection is established.
Orange, single flash Temperature reading has been recorded.
Purple, single flash NFC tag scanned.
Steady red/orange/green USB-C cable plugged in, battery charged to low, medium or full charge.


Connections

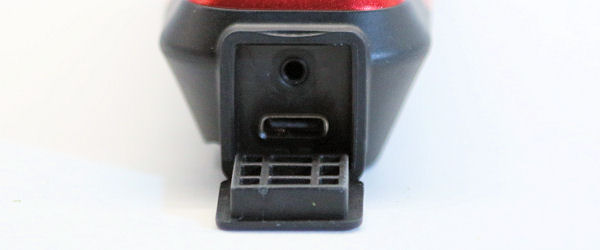
All the connections are on the left end of the unit, concealed behind a flexible cover which provides the IP66 rating to the unit. Behind the cover is the USB-C power connector and the socket for a leave-in temperature probe. Remember that if you have the cover open and one of the two sockets empty, water can enter the unit and you lose the water resistance component of your IP66 rating.


The Reset Button

There is no reset button on the Spark. However, you can perform a factory reset by navigating the menus and selecting "Factory Reset".


Power/Battery/Battery Life

The Fireboard Spark is powered by an internal 2600mAh Li-Ion battery which Fireboard claims will last 12+ months on their website, but only 12+ hours in the Quick Start Guide and in their online FAQ. We aren't sure what to make of that, but we did do a few timings. With Syncmode turned on and the Spark reporting temperatures from a Fireboard 2 Drive, the battery lasted about 33 hours. We also measured battery life with just an external probe attached and SyncMode off. The battery, in this case, lasted almost 24 hours. So, if you want to use the Spark to simply monitor your meat temperature for a long overnight cook, it has plenty of battery to do that. There's no realistic way for us to measure the battery life when the Spark is used only as an instant-read thermometer, but we imagine the battery could last a year if you used the Spark for nothing else.

The unit is charged by using the provided USB-C cable, but no charging block is provided. As noted above, when charging, the multi-color LED will display various colors to indicate the level of the charging. The level of battery charge can also be viewed by going into the menus and displaying Device Info.

The Spark seems to have difficulty figuring out it's battery level:

  • We viewed the Device Info battery level and it said 10%. We plugged in the USB-C cable and it then said 80%.

  • When simply displaying the battery level without charging going on, the Spark would oscillate between values 20% apart.

  • We viewed the battery level in the Device Info which said it was 50%. However, in the App, the battery level was reported as 20%. Several minutes later, they both agreed that the battery level was actually 65%.

  • At times the battery level on the Device Info screen would slowly rise several percent.


Another thing that we'll note is that if you plug in the USB-C cable, the Spark will power on and start charging, as indicated by the LED. If you go into the menus and turn the Spark off while it is charging, the LED will turn off, but the Spark will continue to charge.


Power On/Off And Sleep

If you are only using the instant-read probe, the Fireboard Spark turns on when you open the probe and turns off when you close the probe. If you are not using the instant-read probe, you turn the Spark on by pressing the Function Button. If not using an external probe or SyncMode, the Spark will turn itself off after 30 seconds. If using an external probe or SyncMode, you turn off the Spark by using the "Power Off" option on the main menu.

Under most circumstances, if you leave the Spark unattended, it will go to sleep. What does that mean? Well, the display will turn off for one thing. If SyncMode is active or an external probe is attached, the Spark will send readings to the cloud at a slower rate than when it is awake. If you are watching the App, you may see the Bluetooth and/or Wi-Fi connections dropping and then reconnecting. If only the instant-read probe is active, the Spark will not report any readings to the cloud while it is sleeping.

Waking up from sleep is controlled by a motion sensor inside the Spark. Motion will prevent the Spark from going to sleep as well as waking the Spark up when it is sleeping.

The following table details the action taken by the Spark under various combinations of circumstances:

Instant-Read External SyncMode
Off No Off Turns off after 30 seconds
On No Off Sleeps after 90 seconds
Off Yes Off Sleeps after 10 minutes
On Yes Off Sleeps after 10 minutes
Off No On¹ Sleeps after 30 minutes
On No On¹ Sleeps after 90 seconds
Off Yes On¹ Sleeps after 10 minutes
On Yes On¹ Sleeps after 10 minutes

Notes: 1) When SyncMode is on, it doesn't matter whether another Fireboard device is active or
    not. The timeout values stay the same regardless of whether or not temperatures from the
    other device are being displayed.

It is also worth noting that the Spark will not sleep or turn itself off while it is being powered by the USB-C cable.


Temperature Probes

The instant-read fold-out probe uses a Type K thermocouple.

Measurement Range-58°F to 572°F (-50°C to 300°C)
Accuracy±0.7°F (±0.4°C) from -4°F to 392°F (-20°C to 200°C)
±1.8°F (±1.0°C) otherwise.
Probe Length4.3" (110mm)
Shaft Diameter0.14" (3.5mm)
Tip Diameter0.06" (1.5mm)


The unit also has a socket where you can plug in a 100K Thermistor leave-in temperature probe with a 2.5mm plug. Fireboard sells a number of probes that can be used with the Spark, but be sure to order only the 100K thermistor probes, not the 10K Thermistor probes or the RTD probes. Thermowoks Pro-Series temperature probes can also be used. We did most of our testing with a SF311T food probe from Fireboard:

Measurement Range0°F to 572°F (-18° to 300°C)
Accuracy±1.2°F (±0.7°C) or ±0.1% of reading, whichever is greater.


Temperature Probe Accuracy

We measured the room temperature, the temperature of boiling water, and the temperature of ice water using the Spark's instant-read probe and a Fireboard SF311T food probe. We used our boiling point calculator to determine the boiling point of water in our locaton (212.6°F), then measured the various temperatures:

Probe  Room Temperature   Boiling Water   Ice Water 
Actual 74.9°F 212.6°F 32.0°F
Instant-read (±0.7°F) 74.2°F 212.2°F 32.5°F
Leave-in (±1.2°F) 75.1°F 211.8°F 32.7°F


As you can see, all readings were within the stated accuracy of the probes.


Temperature Probe Speed

Fireboard does not state the speed of the Spark's instant-read probe anywhere we can find, so we are left to trying to determine the speed of the probe as best we can. We found some interesting information on Thermoworks' web site about how they measure the speed of Thermapens and we thought you might find it enlightening too.

To test their Thermapens for reading speed, Thermoworks describes a test rig which allows them to insert a Thermapen's probe into a calibrated water bath. A timer is connected to the Thermapen which can start when the probe is inserted into the water bath and stop as soon as the Thermapen reading reaches the temperature of the water bath. Needless to say, we don't have such a test rig here at the Naked Whiz Publishing Empire, but we can do our best to compare the times of a number of instant-read thermometers.

We filled an insulated vessel with near-boiling water and then inserted each probe to get an idea of their speed:

ThermometerSpeed
Thermoworks Classic Super-Fast Thermapen3.6 seconds
Thermoworks MK4 Thermapen2.4 seconds
Thermoworks ONE Thermapen0.9 second
Fireboard Spark2.1 seconds


So, it appears that the Spark's instant-read probe is in the same class as the previous generation Thermapen MK4 Thermapen.


Calibration

Neither the instant-read probe nor the external probe can be calibrated. Although you can go in the App and navigate to the Probe Configuration screen and change the probe type and the calibration offset for the external probe, these changes are not recognized by the Spark.


Previous Page     Next Page


nakedwhiz.com       Home       Search Our Site       Email The Whiz       Listen To Whizcast       Whizlog       Buy Whiz Gear       Privacy Policy      
All Contents ©2001, 2023 The Naked Whiz
International Association of Fire Safety Science member #1604

You can support this website by shopping at The Naked Whiz Website Store and Amazon.com

You can make donations to The Naked Whiz
Website using Bitcoin! Scan the QR code at
left or copy and paste our wallet ID:

1Bt4vjU9PUQNVvEZZq6ik6jWYr6nr4rJRp


.