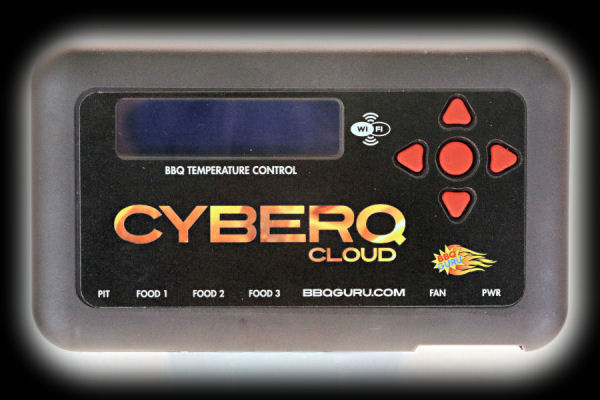
The Display
The display is a 2½" x ⅝" LCD 2 x 16 character display with backlight. The brightness and contrast of the display is adjustable
in the System Setup menu. Here is what the initial display looks like with the backlight on:

This is what displays after the CyberQ Cloud unit comes up and gets past any startup screens:

The "COOKTEMP" temperature is the temperature of the pit probe, while the "FOOD1" temperature is
the temperature of the probe plugged into the Food 1 plug. You can manually scroll down through
this list of items, or there is a "SCROLL" option you can set that will automatically scroll
through the list. Here is what is available on this main display list:

Note that when we photographed these displays, we didn't have any temperature probes plugged into
the unit, so they all display "OPEN". The "OUTPUT:" line tells you the percentage of time that the
blower is actually running. The "TIMER" line shows a timer that you can set and have various actions
taken when it expires. More on this later.
Also note that to set or simply view the target temperatures for the cooker and for each food probe, you have
to select that item. The current target will be displayed and then you can modify it. So, if
you merely wish to view these target temperatures on the CyberQ Cloud device, you must select
each item. This is the only place these target temperatures are displayed on the unit itself.
Display Menus
In addition to the main menu that shows current status of the unit, there are three menus for setting and displaying options:
System Setup, Control Setup and WiFi Setup. To get to these setup menus, you simultaneously press and hold the up and down
arrow buttons. Once the System Setup menu appears, you can then move between setup menus by placing the arrow on the System Setup line and pressing the
left or right arrow buttons.
System Setup Menu
 |
| System Setup Menu |
| Scrolling: On or OFF, controls scrolling of items on the main menu. |
| Backlight: 0% - 100%, controls brightness of display backlight. |
| Contrast: 0% - 100%, controls contrast of display. |
| Units: DEG F or DEG C, specifies units for temperatures. |
| Alarm Beeps: OFF, 1,2,3,4,5, number of beeps when alarm sounds. |
| Key Beeps: ON or OFF, controls beeping when keypad is pressed. |
Control Setup Menu
 |
| Control Setup Menu |
| Cookhold: Specifies pit temperature when timer expires. (See note 3) |
| Timeout: Specifies action to take when timer expires. (See note 3) |
| Alarm Dev: 10-100°F, pit temp deviation that will alarm. (See note 2) |
| Ramp: ON or OFF, turns Ramp Mode on or off. |
| Open Detect: ON or OFF, turns Open Lid Detect on or off. |
| Cyc Time: Number of seconds between cycles. (See note 1) |
| Prop Band: Degrees below set temp that fan starts cycling. (See note 1) |
| Note 1: |
When you start your cook, as your cooker's temperature begins to rise, the blower will be on
100% of the time. When it reaches the temperature that is equal to (Set Point - Prop Band), the
algorithm will kick in and start cycling the blower on and off. Both the Prop Band and Cyc Time parameters
are set at the factory, and will work for most cookers. If you are having difficulty controlling the
temperature of your cooker, you should contact BBQ Guru to see if different settings would be better for your cooker. |
| Note 2: |
The CyberQ Cloud User Guide states that the ALARM DEV parameter specifies the temperature deviation from the
pit set temperature that will alarm. In other words, when set to 50, the alarm will go off if your pit temperature
varies more than 50 degrees above or below the pit set temperature. However, this parameter also controls the
behavior of the food probes. If a food probe alarms (Food Done), the temperature of the food probe must fall at
least the amount specified by the ALARM DEV parameter before it will alarm again. (More on this in the "Alarms" section.) |
Note 3: When the timer expires, the following actions may be specified with the TIMEOUT item:
| NO ACTN | — | No action is taken. |
| HOLD | — | The pit set temperature is altered to the value in the COOKHOLD option, the display flashes
"TIMEOUT HOLD xxx°F" until button is pressed, alarm sounds with number
of beeps specified in ALARM BEEPS option. |
| ALARM | — | Display flashes "TIMEOUT ALARM" until button is pressed,
alarm beeps continuously until a button is pressed. |
| SHDN | — | Blower is turned off, display flashes "TIMEOUT SHDN" until a button is pressed,
alarm beeps continuously until a button is pressed. |
WiFi Setup Menu
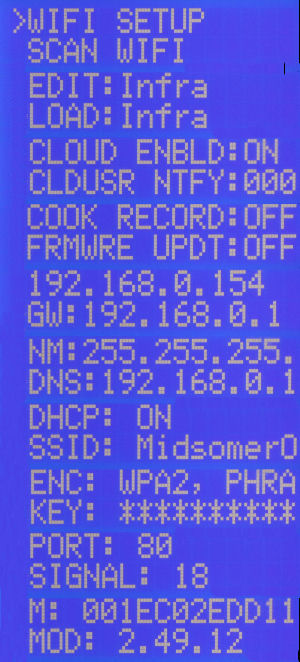 |
| WiFi Setup Menu |
| Scan WiFi: Commands the unit to search for available networks. |
| Edit:Infra or Hotspot, switches between Wifi modes. (See note 2) |
| Load:Infra or Hotspot, Wifi mode unit should come up in. (See note 2) |
| CLOUD ENBLD: ON or OFF, enables Cloud communications. |
| CLDUSER NTFY:000, Share My Cook status delivery time. (See note 3) |
| COOK RECORD: OFF or ON, tells Share My Cook to record your cook. |
| FRMWRE UPDT: OFF or ON |
| 192.168.0.154, IP address assigned to the CyberQ Cloud device. |
| GW:192.168.0.1, Gateway IP address |
| NM: 255.255.255.0, Netmask |
| DNS: 192.168.0.1, IP address of the Dynamic Name Servier. |
| DHCP: ON or OFF, |
| SSID: The SSID of the network that the CyberQ Cloud is connected to. |
| ENC: WPA2 Phrase, Encryption method |
| KEY: ********, Encryption key |
| PORT: 80 |
| SIGNAL: 0 to 100, WiFi signal strength. |
| M: The CyberQ Cloud's MAC address. |
| MOD: Internal code level for support use. |
| Note 1: |
This is what the WIFI SETUP menu looks like after you have connected to your network. To see what it looks like
before you connect to a network, Click Here. |
| Note 2: |
The CyberQ Cloud has two WiFi modes, "Hot-Spot" and "Infrastructure". We explain this later in the review when
we show you how to set up the CyberQ Cloud for WiFi operation. |
| Note 3: |
Share My Cook will send you status notifications via email or text giving you the current status of all your temperatures.
Set this value to 30, for example, if you want an update every 30 minutes. Setting it to 000 disables thse status updates. |
Connections
All the connections are on the bottom edge of the CyberQ Cloud unit. From left to right are the plugs
for the pit probe, the three food probes, the blower and the power cord. They are clearly labeled on
the front of the unit.


Power
The CyberQ Cloud unit is powered by 12V DC. It comes with a power adapter that can be used with 100-240 VAC, 50-60 Hz.
The power adapter has a 5-foot cord. Since the unit has a standard 5.5mm/2.5mm 12V barrel socket on it, you can
use an automobile jump start battery with a cigarette plug to power the unit.
Temperature Probes
The CyberQ Cloud comes with one pit temperature probe and one food temperature probe, although it will support up to three food probes. (Additional
probes are available from BBQ Guru.)
|
The probes are made from stainless steel and each probe contains a type T thermocouple, a more accurate type of thermocouple than you usually see.
(See sidebar). Each probe has a 72" braided stainless steel
cable and can handle up to 500°F (260°C). An alligator clip is provided with the pit probe which you can use to clip the probe to your food grid
or the stem of your dome thermometer. (Cooks debate which location is better. Presumably, placing the pit probe on the grate near the food will measure the
air temperature where the food is cooking. On the other hand, if you are used to cooking by dome temperature, placing the pit probe on the stem of the dome
thermometer will allow you to continue cooking the way you always have.)
The probes and the wires should be shielded from direct radiation from a hot fire. Do not let it come into direct contact with flames.
If you need to shield the wire, you can place a layer of aluminum foil beneath it. Also, having the pit probe itself exposed to direct
radiant heat can cause it to register a temperature which is higher than the air temperature in the cooker, and thus fool the controller
into cutting back on the fire.
|
|
Thermocouples: Type T vs K
Type K thermocouples are the most common type of thermocouple. They are inexpensive, accurate, reliable, and have a wide temperature range.
They are made from Nickel-Chromium / Nickel-Alumel and
have a range of -454°F to +2,300°F and an accuracy of ±4°F or ±0.75%,
whichever is greater.
Type T thermocouples are very stable and often
found in laboratory environments. They are made from Copper / Constantan
and have a smaller range of -454°F to +700°F, but greater accuracy of
±2.0°F or ±0.75%, whichever is greater. |
Temperature Probe Accuracy
We measured the temperature of boiling water using the CyberQ Cloud controller.
Using our boiling point calculator to determine the boiling point of water in our locaton (212.01°F),
we then measured the temperature of boiling water with each of the probes:
| Probe |
Room Temperature |
Boiling Water |
|---|
| Actual |
74.6°F |
212.0°F |
| Food 1 |
73.0°F |
210.0°F |
| Pit Probe |
73.0°F |
210.0°F |
As you can see, both probes registered the same temperature at room temperature, but they were both about 1.6°F low.
As you can also see, both probes registered the same temperature of boiling water, but were 2.0°F low compared to the actual boiling point of water.
Frankly, this really isn't a concern. Both probes were within the error limit for a Type T thermocouple, and 2.0°F
is more than enough accuracy to control the temperature of a cooker. And compared to the 50°F
swing that is typical of most kitchen ovens, 2.0° is a tiny blip. How tiny? Well here is how well our $2200 Bosch oven
holds 300°F:

That's a 43°F swing on the last oscillation. Again, an error of a few degrees on your pit temp is irrelevant.
Calibration
The temperature probes cannot be calibrated, or more correctly, the CyberQ Cloud controller cannot be calibrated by the user. If your
probes all consistently read off by a significant amount, you should contact BBQ Guru support to consider having them recalibrate your
unit.
|


