 |
|
Assembly
Assembly took us about 90 minutes. Whereas most kamado cookers come with a very few pieces and parts, the Akorn comes with lots and lots of pieces and parts. 33 pieces and parts. 92 pieces and parts if you count all the bolts and nuts and such. The instructions say you only need a 7/16" nut driver, but honestly, all the little bolts have slightly rounded heads. You have to get a nut driver or socket on the bolt head absolutely straight and perfect or you will find the socket not gripping the head and the head getting even rounder. We chose instead, after trying to tighten a few bolts with a socket wrench, to use large and medium phillips head screwdrivers. Much easier! Otherwise, just follow the instructions. They are clear and easy to follow.
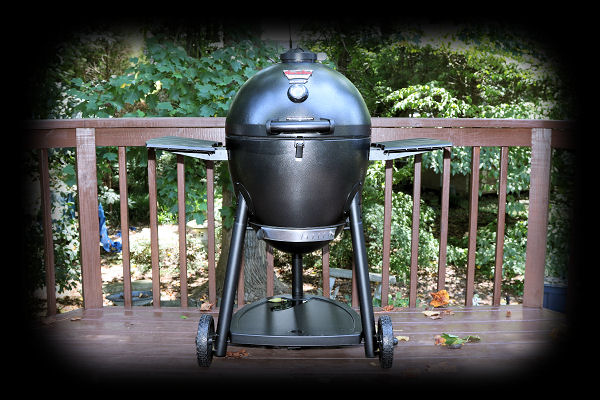
Photo Tour of the Akorn Kamado Cooker
Now let's take a closeup look at some of the features and components that make up the assembled Akorn Kamado cooker.
The Top Vent
Let's start with the top vent. It is a simple rotating cap with four wedge shaped openings in it. The top vent is permanently attached to the dome, so the widest open setting is as much opening as you can get. (Unlike some other cookers where you can remove the top vent altogether to get maximum airflow.) This is probably purposeful since the manufacturer is clear that you should never exceed 700°F with the cooker. The top vent has a nice handle with a silicone cover making adjustments easy and painless. Although the instructions indicated that there should be some sort of index on the top vent, there was none on our vent.
A few more words about the top vent: The vent will close tightly enough to snuff out the fire when you are done cooking. Also, the top vent is not watertight. During a rain, water can get into the cooker. It is highly recommended that you buy a cover and use it on your cooker when you aren't cooking.
The Thermometer
Next, on to the thermometer. The thermometer stem extends through a hole in the outer metal layer of the dome, through the insulation between metal layers, and then through a hole in the interior metal layer of the dome. As previously noted, the thermometer has a 2" dial that is marked 100°−700°F and 40°−370°C. The stem extends approximately ⅞ inch into the cooker. The thermometer sits in a bezel and is affixed to the lid by a wing nut. There is also a thin rubber gasket that goes between the thermometer bezel and the surface of the lid.
Inside The Cooker
Now, on to the inside of the cooker. There isn't much to show that we haven't already shown you in the previous section. There is a one inch gap between the inner wall of the base and the firebox. This will allow air to flow up from the lower vent around the firebox instead of going through it, but again this is probably a good thing as it limits the amount of air that can go up through the fire. In light of the 700° temperature limit on this cooker, this should help to keep the fire from getting out of hand.
Also below you can see a picture looking down into the firebox showing how the charcoal grate rests on a lip in the bottom edge of the firebox. You might be tempted to use the firebox/charcoal grate like a Kickash Basket, but fight the urge. Shaking will dislodge the grate and then you will have a bit of a mess to deal with.
The Grates
Next let us look at the grates. There are either two or three grates, depending on how you count. The main cooking grate is cast iron and consists of two parts. The central round grate comes out, we suppose for adding smoking chips and chunks during a cook. The cast iron grid weighs 8 pounds and 3 ounces. The overall grate is 19¾ inches in diameter while that center round insert is 7½ inches in diameter. This gives you approximately 306 square inches of cooking space on the main grid. The cast iron grate sits about at the level of the opening between the lid and base. The "rods" of the grate are spaced approximately ¾ inches on center. The cross section of each "rod" is triangular. Each rod is about 5/16 inches wide at the base and about ¼ inches tall.
The warming grate is chrome plated steel and is 13¼ inches in diameter which yields almost 138 square inches of space. It sits about 5 inches above the main cooking grate and as you can see, it can pivot to the side and out of the way if you need access to the main cooking grate. The rods on the warming rack are about 1/16 inches in diameter and spaced approximately ¾ inches apart on center
The Gaskets
There is a gasket on the edge of the lid to seal the gap between the lid and the base. There is another gasket on the bottom edge of the base to seal the gap between the base and the ash pan. So far, the gasket on the lid looks in great shape after several weeks of cooking. We mention this because another cooker make by this company, the former Big Steel Keg, had gaskets that would easily develop holes where they rubbed against the rivets along the edge of the base. We saw one in a Sam's Club that had numerous such holes and the cooker had never been heated up. We also hear these gaskets can be damaged by high heat, but again, so far our gasket seems to be holding up well.
As you can see in the photo below, the gasket is only tacked to the lid at intervals. We did notice air leaks in the form of smoke leaking out from the gap between the lid and the base.
The Hinge
The hinge is not particularly heavy or sturdy. The lid of this cooker is quite light so there is little need for much more strength than the hinge provides. It does allow the lid to move side to side about ¾ inch, so a little more rigidity would not go amiss. As it is, the hinge and lid just don't feel very sturdy or well made. Any movement of the lid rubbing against the rivets in the base will probably hasten the formation of holes in the gasket. Also, because the lid is so light, there is no need for any springs on the hinge assembly. You can easily lift the lid and then once you have opened it sufficiently, gravity keeps it open.
The Handle
The handle is made from what feels to be a relatively cheap piece of wood. We haven't used this cooker much as of this writing, and you can see that the paint is already peeling off the handle. It's quite surprising that they didn't just use an appropriately shaped steel pipe instead.
The Lower Vent and Ash Pan
Here are some photos of the lower stainless steel vent. It is part of the removable ash pan which is held up against the base by two latches. It slides easily and as you can see there are six markings to help you reproduce various vent settings. The opening in the bottom vent is approximately 4½ by 1¼ inches. Those numbered marks you see are about 1⅞ inches apart. once you get inside the sliding door, you will find another set of smaller openings in the ash pan's inner wall. There are 3 ovals that are 2½ by 1 inch.
For those interested in temperature controllers, the rails of the lower vent are about 1⅞ inches apart. We have verified that the Flame Boss 200-WiFi temperature controller
adapter will fit this cooker. You can check the adapters for other makes of temperature controllers to see if they will fit.
There is no spark screen so you do need to keep watch for sparks and embers coming out the lower vent. We have seen sparks and embers exit the lower vent on our other kamado-style cookers and see no reason why it might not happen with this cooker also.
The ash pan is removable for disposal of ashes. Below, see photos of the two mating parts in the ash pan and the base, the two parts mated, and one of the two clips that the hold the pan tightly against the base. To remove the ash pan, you simply undo the two clips first. The ash pan then lowers about ½ inch and is suspended by the disk that slots into the bracket on the base. Now, you pull the ash pan forward and then you can lower it away from the cooker.
Accessories
In the way of accessories, we have only acquired two: the cover and the heat deflector.
The cover seems quite substantial and is quite an upgrade over the cheap cover we purchased from Walmart at the time we bought the grill. It hasn't been through any tough weather yet, but it appears that it should last a while.
The other accessory we purchased was the heat deflector. According to the packaging it can also be used as a baking stone. The heat deflector measures 17 inches across including the legs. It measures 13 inches across exclusive of the legs.
The heat deflector sits on the three ledges on the sides of the firebox interior. As you can see, how you orient the firebox dictates if you have a gap at the back of the firebox or not. Since most kamado cookers have a hot spot in the back due to air flowing into the bottom vent and continuing up the back of the cooker, you should be sure to orient the firebox so that there is no gap at the back.
When the heat deflector and the grid are both in place. the gap between the upper surface of the deflector and the bottom surface of the grate is 3⅝ inches.
You can support this website by shopping at The Naked Whiz Website Store and Amazon.com
|

